Subtle High-Low Skirt Tutorial-from Skirt or from Scratch!
Hi! Good morning to you!
So I've been trying to post this tutorial for simply. ages. But as most of us mommy bloggers understand, it sometimes takes a lot to get pictures of ourselves. I so envy those bloggers whose husbands are photographers! Even with a tripod and a timed shot setting it is really difficult. My house is really dark so it's tough to get a good photo in there and the "neighborhood" I live in is remarkably unphotogenic. Pair that with the fact that I watch two extra kids every day and the fact that I never have makeup on...and you see why Paige's perfectly dimpled face graces the blog a lot more than my own. :o) And then of course there is the whole "Ugh! My nose! Do my hips really look that wide?? Why is my hairline crooked?" and the list goes on.
But my husband snapped a few shots of me last night and I said "Good enough!" because I'd really like to share the tutorial with you before this trend goes out of style. :o)
.jpg)


.jpg)
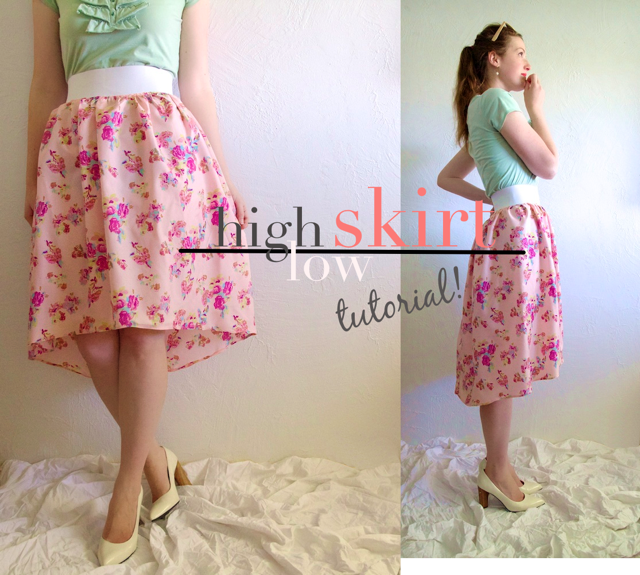
The high-low skirt, sometimes referred to as a "mermaid" skirt, "asymmetrical" skirt or unflatteringly as the "mullet" skirt is just simply a skirt that is longer in the back than the front. Many of them you see are super-short mini in the front and maxi in the back, but that's not how I roll. So I whipped up a church-going, toddler-toting version. :O)
It's really easy! And you can make it from scratch, or skip the first 6 steps and make it from an existing skirt by simply altering the hemline.
- Start with a big piece of fabric that is 1.5-2x as wide and your hip measurement and the length you'd like the back to be + 1 inch. My skirt piece was 60"x30" and I'm 5'8". Then fold it in half with right sides together. (And if you're thinking it looks like right sides out in the photo...you're right. Oops!)

- Sew along the edges to make one big tube-shaped piece. If you're using "super-frayish" fabric, like me, sew a zigzag stitch just to the right of your straight stitch.

- Wrap 3" wide elastic around your waist to measure, add 1" and cut. Sew ends together as pictured:

- (Not Pictured) Sew a straight stitch on the longest stitch length along the top of the skirt, then pull the top thread gently to gather the top of the skirt piece to about half its size.
- Pin elastic to the skirt in four (or more) equal places. The elastic seam and skirt seam should match up, with right sides facing.

- Sew the elastic on along the top of the skirt piece, stretching it a little as you go to match the length of the skirt piece.

At this point you will have an unhemmed skirt!

- Lay the skirt flat and on its side with the seam on the left side:

- Find out how much you want to trim off the top (I did 8") and subtract 1 inch for a small hem. Cut a 2-3" slit in the front(right side) of the skirt. (This keeps the hemline from coming to a peak in the front.)

- Use a measuring tape to cut a diagonal line from the slit to 2-3" from the back seam. (Again, to avoid a peak in hemline.)

- Fold under twice and sew to create a tiny hem. This is a little tricky as your skirt is cut in a slight curve now, but don't worry, just take your time and do your best!


The lighter and more drape to your fabric, the better. This look is definitely better with a fabric that moves well and it's too stiff or heavy.
And if you do prefer a more dramatic high-low skirt, you use the same technique, but with more of a "U" shape in your hemline. Here is little tutorial for that!
Have a good start to your week!
Love,
Disney
<3 it. :)
ReplyDeleteGorgeous! I love these high low skirts... hoping they stay in style for a while! (that rhymes!)
ReplyDeleteWhat a great tutorial! Such gorgeous photos - of you AND the skirt-making steps! I know just what you mean about wishing for someone else to take pictures (although for me it's usually when I'm demonstrating something that takes 2 hands). Blogging is harder than it loooooks!
ReplyDeleteLove it! Turned out so cute....and the pics are lovely too :) I love the look of your hemline as I'm not for the really drastic ones either. Thx for sharing!
ReplyDeleteI've always wondered how they got the right and left sides of the skirt to line up and match perfectly. Of course you would fold it in half and just draw a line for the front to be shorter than the back...it's genius yet so simple. I learned something cool today...thanks.
ReplyDelete-Jackie
amazing.
ReplyDeletexo
http://the-caramel-dream.blogspot.com/
I love this! I've been seeing skirts like this and love the look. Thanks, Disney!
ReplyDeleteThis is so cute! I can't wait to try it. I'm following you. :)
ReplyDeleteNiki
http://www.nikisnotebook.blogspot.com
This is a really super cute skirt! I absolutely love the feminine flirty fabric you picked, beautiful!
ReplyDeleteLove it. I am going to do this! BTW, you are beautiful. I know we are always harder on ourselves. It does feel good to get dressed up and take pictures doestn't it?
ReplyDeleteI love this! Thank you for the tutorial!
ReplyDeleteI agree with @Emily we are always to harsh on ourselves. You're a pretty lady and these are great photos (of a great project). As for the perils of modern day blogging - have you thought of using a little remote? They're super cheap and my photos I get my photos done so much quicker. Not sure if that helps, but hope it does :)
ReplyDeletex Elena @ Randomly Happy
Thanks for the super tips on this one! Your fabric is divine...
ReplyDelete:) Thank you for the tutorial!
ReplyDeleteI gotta say, I made a dress one time with a circle shirt and it end up just like that! No effort to do so, no idea why... but it looks very good and thankfully the hem is even! lol
And I understand so well not having a photogenic neighborhood and no photographer around (including myself! :S) Good to know I am not alone!! :O Your pictures turned out great anyway!
Love from Portugal
Rita
seelovemake.blogspot.com
love it! If only I know how to sew.. :(
ReplyDeleteI really like this look on you. It always makes a waist look pretty.
ReplyDelete~Clarissa Rivers
{I'm an inventor, and a fashion blogger too! www.waste-knot.blogspot.com}
Just so you know...you are rediculously pretty and photogenic and of course creative and talented (and I get the feeling that you're really nice too). I like that when I look at the photos on your blog I'm seeing what things look like on a real person who has to wear the stuff in real life...not on an airbrushed model who doesn't need to carry around a toddler and a baby everyday.
ReplyDeleteSo...lots of love to you.
Well what a ridiculously nice comment! (...Mom??) :) I know what you mean about the models. I always think: "oh, I want those jeans!" but what I really mean is: "I want my legs to look like that in jeans!" It's so nice to see clothes on different sizes of people.
DeleteI completely agree with the anonymous commenter above! You are beautiful, and when I look at these photos I don't see any of the flaws you listed - just a lovely young woman wearing a lovely outfit on a lovely day. We are always our own worst critics, it's true. You're lovely and your blog is lovely. Please keep up with the 'real person' photos - we all appreciate them! :)
Deleteyou are so talented & such a great inspiration :)
ReplyDeleteThis comment has been removed by the author.
ReplyDeleteGreat job, it turned out cute. I did a similar one here (http://barnnumber2.blogspot.com/2012/05/hi-low-skirt.htm) with a skirt I picked up at a thrift store. Love your blog by the way
ReplyDeleteAs always... amazing, Disney! Thank you for the tutorial. Would you be willing to share where you got this fabric? How lovely!
ReplyDeleteThank you in advance!
It came from Walmart, amazingly! I used to think they didn't have any cute fabric, but they've been getting a few cute prints in!
DeleteLove the tip: making the slit in the front so it doesn't come to a peak. Thanx! PERFECT!!
ReplyDeleteI too empathize with the self-pho issue. I somehow end up looking yellow in all of my indoor shots because the light is so bad. Buh.
ReplyDeleteAnyways, the skirt is cute, and you are lovely!
-Katie
http://loverlysheblog.com
Totally unrelated question... What are the dress codes for church? I am going to a Christening soon and I haven't been to church since I was a kid, I dont want to offend anyone or turn up looking too formal.
ReplyDeleteSo pretty! And i like that it's only a subtle dip down at the back. Great tutorial
ReplyDeleteI love pics of you with your glasses on. You're too cute!
ReplyDeleteGreat tutorial. I have been hunting around for a tutorial for ages for this type of skirt.
ReplyDeleteRight Where is the fabic !!
You have just given me my Easter outfit! I'm going to make this and either the "Gardens at dusk" or "ruffly shirt refashion"...and maybe the lace necklace. Thank you!
ReplyDeleteluv it... cuteeee....
ReplyDeleteHi, this is so wonderful and I am a beginner but I learned so quickly by just watching the tutorial, glad I found this cause it is exactly what I want. God bless and Thanks!
ReplyDeleteThis is great, just what I have been looking for - I was going to just try it myself (on a too-short but long skirt I have already) but this will give me a nice bit of guidance as I go - thank you for sharing :-)
ReplyDeleteHannah ♫
Sew Lah Tea Dough
Awesome and I love your dress sense! Thanks for sharing.
ReplyDeleteLovely skirt, going to make a few of these . You look gorgeous by the way. Watch out UK, dippy hem style coming your way. Very generous of you to share.
ReplyDeleteHello
ReplyDeleteI make tulle skirts often, but I always cut the tulle into a circle skirt first then add the waist band.
If i did it your way, will it be as flare as it is with a circle skirt?
There would be less of a distinct flair using the method in this tutorial...I'd love to see this high-low look on a tulle circle skirt, that would be lovely!
DeleteI love this style :) can't wait to try this dress, looks easy and oh so cute..
ReplyDelete