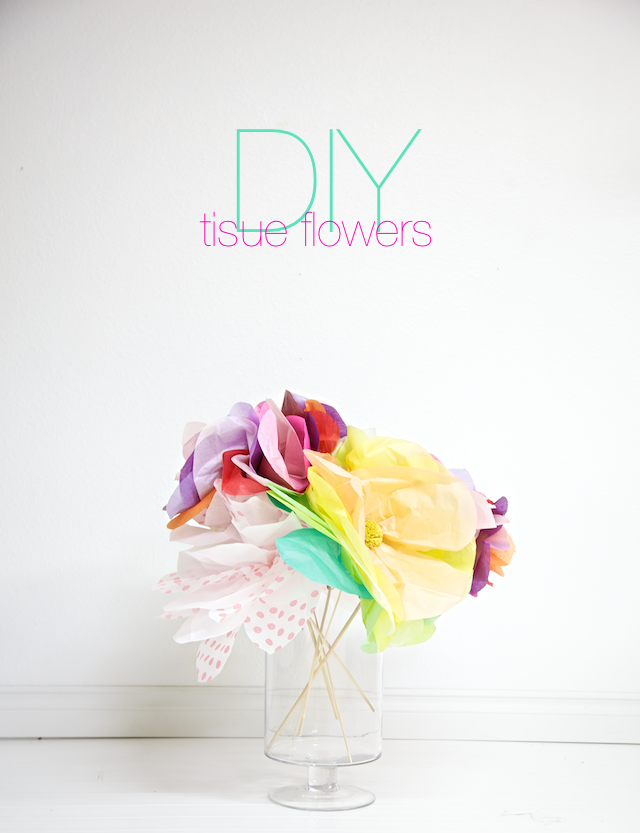
DIY Tissue Flowers!


Here is the tutorial, as promised! OK, not exactly AS promised, because today isn't last Friday, but whatev. I'm just so fabulously busy, you know... ;o)
I was hosting a friend's baby shower earlier this year and I wanted lots of flowers and butterflies so one afternoon at my friends' house I just laid out some tissue paper and started folding and cutting like I knew what I was doing, and it worked!! Yes! It was so satisfying because my friend was totally impressed by my improv-crafting skills and my ego went up like three levels. Which was really good, I really need moments like that once in a while as my daily life is usually just a procession of assorted humiliations. I'm not even kidding, you guys. "Oh, hey stranger, you're reaching for a hug? I love hugs!! ...oh...you were just gesturing with your arm...um. Sorry I hugged you."
It's so bad.
Wait-what were we talking about? Oh yeah, flowers.
So, you can definitely make these, they are so quick and easy. Paige made like infinity of them and they looked awesome! So you can do this. And if you do, can you tag me somewhere? 'Cause I really want to see. :O) Here we go!

- Select tissue paper for your flowers. You will need 4-8 sheets, depending on the desired fullness. I used 8 for these, but you can see the 4-sheet version in the very last photo.
- Layer your tissue paper on top of each other in the order that you want your flower to be. The top layer will be the flower's center. (Unless you turn them upside down in step two like I did...derp.) Cut in half equally.

- Fold each stack in half lengthwise.

- Then fold in half widthwise.

- Trim around the open (non-folded) edges to make it petal shaped.

- Open up and begin off setting each layer of tissue slightly, starting at the bottom. My rule of thumb is to shift each petal to the right until it is in the middle of the other two underneath it.

- Keep shifting until you get to the top layer.

- Place your left hand in the middle of the flower and hold it there...

- ...use your right hand to gather the tissue around your left fingers from the bottom. Give it a little twist to hold it in place.

- Poke a 12'' (or whatever) dowelling stick through the top.

- Cover the top of the dowel with hot glue before sliding down to the center of the flower.

- Hot glue sequins or ribbon to the top of the flower "stem".

- And finish with a fun pom pom glued inside the center!

And enjoy!

To make super-giant versions of these like I hung from the ceiling at the friend's baby shower, leave the tissue papers intact instead of cutting them in half in step one.
.png)
I hope you have the best day ever! :O)
I love you,
-Disney
Wow, they look lovely Disney! You are very creative. You worry me you say things like 'my daily life is usually just a procession of assorted humiliations'. I can't imagine anyone wanting to humiliate you as you bring so much joy to other people's lives. Big hugs from over here in Australia.
ReplyDeleteThank you so much!! Haha, I just meant that I humiliate myself daily. I've always been a little probe to awkward moments. :)
DeleteProne* :)
DeleteOkay, that makes me feel much better :-)
ReplyDeleteThese flowers are so beautiful! :)
ReplyDeleteThank you!!
DeleteThese flowers are so beautiful! :)
ReplyDeleteI love the addition of the pom pom in the middle! For an Easter brunch at my church I made about 600 origami butterflies to hang from the ceiling. I think for the next event I will make these flowers! Thanks!
ReplyDelete600?! My goodness, you're amazing!! And thank you, I feel like nothing is ever really finished until there are poms. :)
Delete